Knowledge
Loading Patterns For Strength And Muscle Gains
Articles, Muscle gain, Strength and performance, Training

Loading Patterns For Strength And Muscle Gains
Besides exercise selection, the most important factor involved in developing size and strength is the nature of the load. This is a function of three separate but interrelated elements:
- The magnitude of the load (amount of weight used)
- The number of reps per set (dictated by the magnitude of the load)
- The loading pattern
Intensity, Hypertrophy, And Training Experience
Your body adapts to training-induced stress by making itself stronger and more resistive to physical loading. In simpler words, the more experienced a trainee is, the better his body is built to tolerate training stress.
To explain that fact, we can use a simple analogy: A man starts to work a physically demanding job (e.g. farm work). He does manual labour tasks eight hours a day. At first he’ll get extremely tired by the end of the day and be painfully sore the next morning. But over time, the more experienced he becomes at his job, the daily workload doesn’t affect his body as much. His body has adapted to the very brutal physical demands of his work.
Same goes for strength training (which is basically artificial manual labour). The more years a trainee has put in, the better his body is at handling training-related stress. So it should be obvious that the more experienced a trainee is, the higher the training stress level should be to elicit progress.
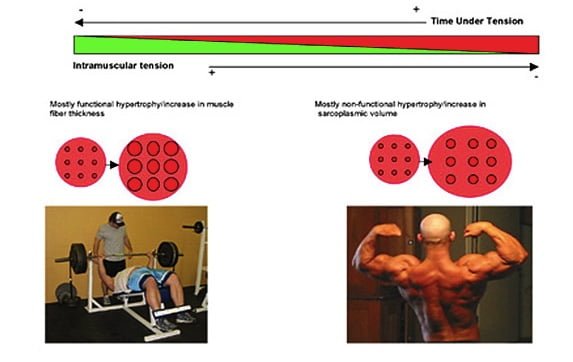
There’s also what’s called an “optimal intensity threshold” (OIT) that must be surpassed if maximum hypertrophy is to be stimulated. You can use all the advanced methods in the world or perform sets until the cows come home, but if you don’t train past that threshold you won’t stimulate maximum growth.
The following table indicates the ideal training intensities, depending on the level of the trainee:
| Experience Level | Optimal Intensity Threshold | Acceptable Intensity Range |
| Beginner | 60% | 50-70% |
| Intermediate | 70% | 60-80% |
| Advanced | 80% | 70-90% |
Now understand that even if you train under the optimal intensity threshold (or even under the acceptable intensity range), you can still stimulate some muscle growth. However, this increase in muscle size will mostly be of the non-functional type. This is called sarcoplasmic hypertrophy and it refers to an increase in the elements of the muscle cell other than the muscle fibres. As a result of this type of hypertrophy, a muscle can get bigger, but its strength won’t improve much, if at all.
This table displays the different training zones depending on the level of a trainee:
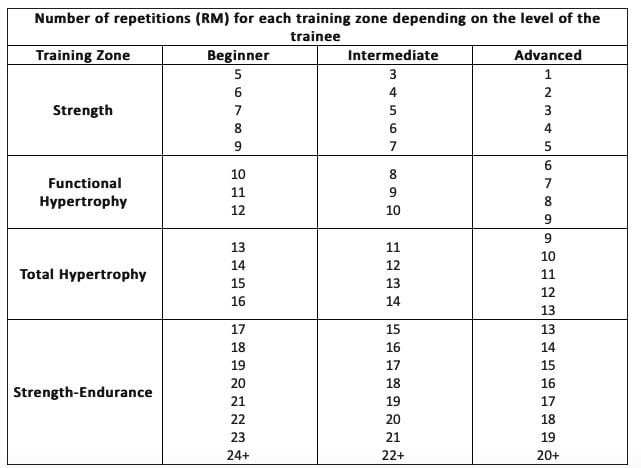
For maximum muscle growth, a trainee should spend most of his training time in the functional and total hypertrophy zones. Training volume should be divided about 40//40 (percent-wise) between those two zones (normally use the functional hypertrophy zone for compound exercises and the total hypertrophy zone for isolation exercises).
Every once in a while, (the other 20%), it’d be smart to spend some time in the strength zone because this will increase myogenic tone (muscle tonus), creating a denser and harder look. It’ll also increase the capacity of the nervous system to recruit muscle fibres which will enhance the effect of the subsequent bouts of hypertrophy training.
Strength-endurance work (especially when used with short rest intervals) can help with fat loss, vascularization, and even serve as active recovery if the loads used are very light.
The following table briefly explains the benefits of each training zone:
| Training Zone | Name | Positive Effects |
| 85-100% | Limit strength | Increase in strength Stimulation of functional hypertrophy Increase in muscle density |
| 80-85% | Functional hypertrophy | Stimulation of functional hypertrophy Increase in strength |
| 70-80% | Total hypertrophy | Stimulation of total hypertrophy (functional + non-functional) Slight increase in muscle endurance Improved lactic acid tolerance |
| 50-70% | Strength-endurance | Increase in non-functional hypertrophy Increase in muscle endurance Improved capillarization |
| – 50% | Endurance-strength | Increase in muscle endurance Improved capilarization Active recovery Speeds up recovery from tendon injuries |
Loading Patterns
A loading pattern refers to how the sets for one exercise are arranged. For example, straight sets will have you use the same weight and reps for all your work sets while wave loading, pyramidal loading, or plateau loading will vary the load and reps with each set. Let’s take a look at each.
Straight Sets
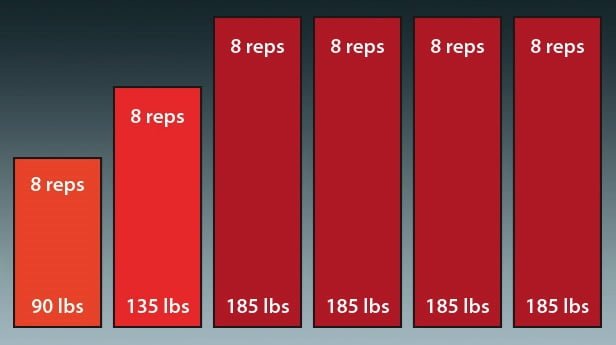
When performing straight sets, you execute one or two warm-up sets then jump right into your working weight, which you maintain for the whole exercise. For example, let’s say that your program calls for 4 x 6-8. You’d do:
1 x 8 @ 90lbs (warm-up)
1 x 8 @ 135lbs (warm-up)
4 x 8 @ 185lbs (work sets)
It’s possible that due to fatigue you won’t be able to complete the 8 reps on your last set or two. That’s why the prescription calls for 6-8 reps. I believe in giving a 2 rep “give” when designing a program. If you’re in top shape and the program calls for 6 reps but you’re able to do 8, isn’t it better to go up to 8? Sure it is!
And if you’re tired and are not able to perform the prescribed 8 reps, does it mean that you screwed up your workout? No, as long as you can stay within the 2 rep range you’re fine.
Graphically, straight sets look like this (we’ll keep our 4 x 6-8 example):
Wave Loading
Wave loading refers to a loading pattern where the load and reps change with every set within a wave. A wave is a group of 2-3 sets. Normally 2 waves are performed when training for muscle size, while 2-4 waves can be used when training for strength. You should try to use heavier weights with each new wave.
When planning a hypertrophy wave, you want to have one of the two following patterns:
Hypertrophy Wave With Strength Gains
Set 1 – Total hypertrophy zone
Set 2 – Functional hypertrophy zone
Set 3 – Strength zone
Hypertrophy/Strength Wave
| Set | Beginner | Intermediate | Advanced |
| 1 | 15 reps | 10 reps | 12 reps |
| 2 | 12 reps | 8 reps | 6 reps |
| 3 | 8 reps | 6 reps | 4 reps |
| 4 | 15 reps | 12 reps | 10 reps |
| 5 | 12 reps | 8 reps | 6 reps |
| 6 | 8 reps | 6 reps | 4 reps |
Hypertrophy Wave With Strength-Endurance Gains
Set 1 – Strength-endurance zone
Set 2 – Total hypertrophy zone
Set 3 – Functional hypertrophy zone
Hypertrophy/Strength-Endurance Wave
| Set | Beginner | Intermediate | Advanced |
| 1 | 20 | 18 | 15 |
| 2 | 15 | 12 | 10 |
| 3 | 12 | 10 | 8 |
| 4 | 20 | 18 | 15 |
| 5 | 15 | 12 | 10 |
| 6 | 12 | 10 | 8 |
When training for strength, one of the following wave patterns can be used:
Mixed Strength/Functional Hypertrophy Wave
Set 1 – Functional hypertrophy zone
Set 2 – Strength zone high end
Set 3 – Strength zone low end
Mixed Strength/Functional Hypertrophy Wave
| Set | Beginner | Intermediate | Advanced |
| 1 | 10 reps | 8 reps | 6 reps |
| 2 | 8 reps | 6 reps | 4 reps |
| 6 | 6 reps | 4 reps | 2 reps |
| 4 | 10 reps | 8 reps | 6 reps |
| 5 | 8 reps | 6 reps | 4 reps |
| 6 | 6 reps | 4 reps | 2 reps |
Mixed Relative/Limit Strength Wave
Set 1 – Strength zone high end
Set 2 – Strength zone middle
Set 3 – Strength zone low end
Mixed Relative/Limit Strength Wave
| Set | Beginner | Intermediate | Advanced |
| 1 | 9 | 7 | 5 |
| 2 | 7 | 5 | 3 |
| 3 | 5 | 3 | 2 |
| 4 | 9 | 7 | 5 |
| 5 | 7 | 5 | 3 |
| 6 | 5 | 3 | 2 |
Relative Strength Wave
Set 1 – Strength zone middle
Set 2 – Strength zone low end
Set 3 – Strength zone low end
Relative Strength Wave
| Set | Beginner | Intermediate | Advanced |
| 1 | 7 reps | 5 reps | 3 reps |
| 2 | 6 reps | 4 reps | 2 reps |
| 3 | 4 reps | 2 reps | 1 reps |
| 4 | 7 reps | 5 reps | 3 reps |
| 5 | 6 reps | 4 reps | 2 reps |
| 6 | 4 reps | 2 reps | 1 reps |
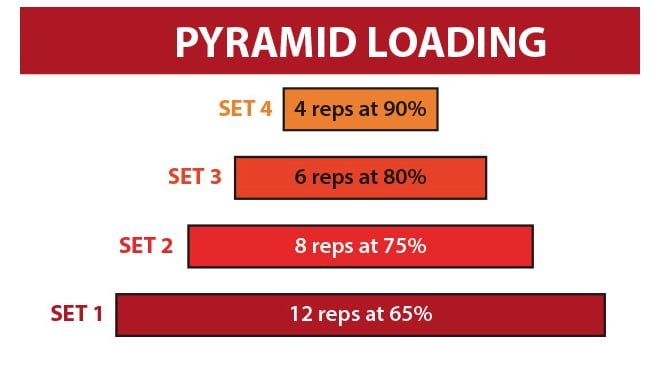
Pyramid Loading
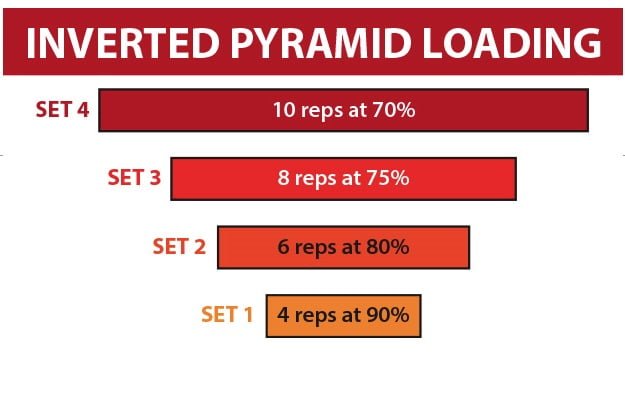
The pyramid schemes are somewhat outdated but can still be used when training for muscle size (not so much when training for strength). In a regular pyramid, you start with a higher number of reps and a lesser amount of weight, and with each set, you increase the weight while reducing the reps. In an inverted pyramid, you do the opposite: you start with a heavyweight for a few reps and decrease the load with each set while increasing the reps.
In a double pyramid you start as a regular pyramid: begin with higher reps and decrease them for your next 2-3 sets, then increase them again for your last set or two.
Here are some illustrations of what a pyramid pattern might look like:
There are two problems with pyramid loading schemes. They either:
- Cause too much fatigue to make the heavy set effective (regular pyramid scheme)
- Start heavy too soon, when the CNS isn’t properly activated (inverted pyramid)

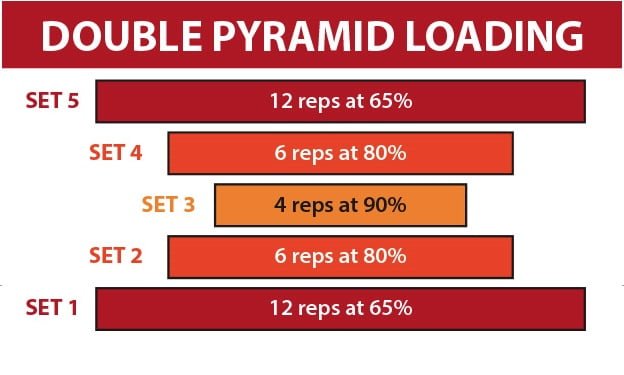
The double pyramid, which is somewhat similar to wave loading, is less problematic and should be the preferred pyramid pattern if you choose to use one.
Flat Pyramid Loading
This method is somewhat similar to regular pyramid loading in that the load is progressively increased with each set. However, the number of reps stays the same. This means that only the last 1-2 sets are actually true work sets while the other 2-3 are progressive warm-ups (they still have a training effect though).
This is the type of loading scheme used by Dorian Yates among others. It’s often believed that Yates trained using HIT or Heavy Duty in which one performs only one set of an exercise to failure. Not so! Yates actually performed up to 5 sets of an exercise but only the last one was a true limit effort.
This method is interesting when training in the functional hypertrophy zone because it allows you to get your CNS and muscles geared up for a limit effort gradually without causing too much fatigue (which would impair the limit effort). However, in most cases, the “effective volume” (EV), or a number of reps that are tough enough to cause an adaptation, is too low.
It’s a nice change of pace when you’ve been doing high volume training for a long time though. For example, if a trainee has been on a high volume routine for 6-8 weeks, including 3-4 weeks of flat-pyramid loading with a low volume of work will enable the body to recover from the previous bout of high volume work and a supercompensation effect will occur. This is called delayed adaptation.
The following table illustrates what a flat pyramid scheme might look like:
| Set | Beginner | Intermediate | Advanced |
| 1 | 10 reps @ 50% | 8 reps @ 55% | 6 reps @ 60% |
| 2 | 10 reps @ 55% | 8 reps @ 60% | 6 reps @ 65% |
| 3 | 10 Reps @ 60% | 8 reps @ 65% | 6 reps @ 70% |
| 4 | 10 Reps @ 65% | 8 reps @ 70% | 6 reps @ 75% |
| 5 | 10 reps @ 70% | 8 Reps @ 75% | 6 reps @ 80% |
Plateau Loading
Plateau loading is somewhat similar to pyramid loading except for two differences:
There aren’t as many different steps, and more than one set is performed at each step.
You basically perform different plateaus (2 to 4), each one having 2 sets at the same training load and reps. After a plateau, you can start another one either of higher intensity or of a lower intensity level. Here are some examples:
Example of a Simple Progressive Plateau
| Set | Beginner | Intermediate | Advanced |
| 1 | 12 reps | 10 reps | 8 reps |
| 2 | 12 reps | 10 reps | 8 reps |
| 3 | 10 reps | 8 reps | 6 reps |
| 4 | 10 reps | 8 reps | 6 reps |
| 5 | 8 reps | 6 reps | 4 reps |
| 6 | 8 reps | 6 reps | 4 reps |
Example of a Simple Regressive Plateau
| Set | Beginner | Intermediate | Advanced |
| 1 | 8 reps | 6 reps | 4 reps |
| 2 | 8 reps | 6 reps | 4 reps |
| 3 | 10 reps | 8 reps | 6 reps |
| 4 | 10 reps | 8 reps | 6 reps |
| 5 | 12 reps | 10 reps | 8 reps |
| 6 | 12 reps | 10 reps | 8 reps |
Example of a Double Progression Plateau
| Set | Beginner | Intermediate | Advanced |
| 1 | 10 reps | 8 reps | 6 reps |
| 2 | 10 reps | 8 reps | 6 reps |
| 3 | 8 reps | 6 reps | 4 reps |
| 4 | 8 reps | 6 reps | 4 reps |
| 5 | 12 reps | 10 reps | 8 reps |
| 6 | 12 reps | 10 reps | 8 reps |
I personally prefer the double progression plateau because it allows you to be properly prepared for the heavier sets while not being too fatigued to perform well.
Conclusion
As you can see, there’s more than one way to get big and strong muscles! But if you understand the basic scientific principles behind the whole process, you’ll be better equipped to design effective and efficient training programs. Now go do it!
-CT
*Originally posted on www.t-nation.com 06/20/05