Knowledge
Special Exercises Series – No.7 Anderson Squats
Articles, Muscle gain, Strength and performance
Special Exercises Series - No.7 Anderson Squats
Paul Anderson was likely the strongest squatter of all time. In the pre-steroid era, he squatted 1200lbs without any supportive gear (squat suit, super tight knee wraps, 6” belt, etc.). He also deadlifted 1000lbs with hooks to hold on to the bar (similar to the straps that we use now).
It is rumored that after he went to the Soviet Union to compete in weightlifting, the Soviets built squat racks and started using the squat as their main assistance exercise!
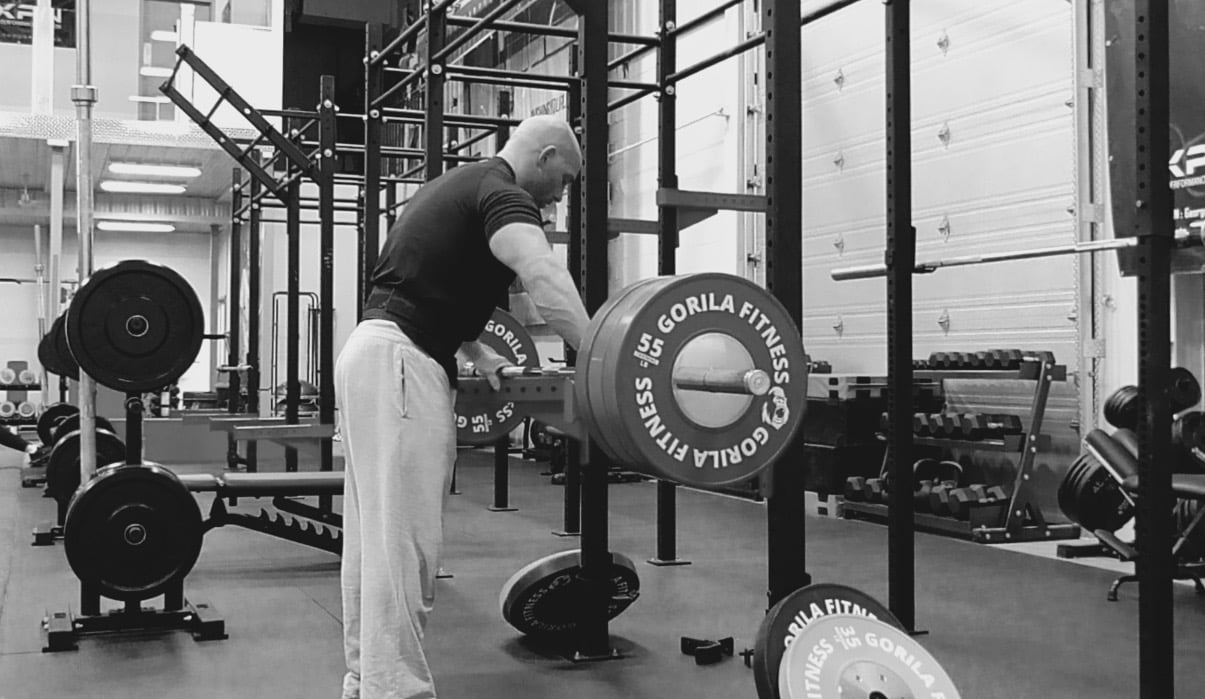
One of his main squatting exercises was squatting from pins in a power rack, from the low position. Also called “bottoms-up squats”. This is likely the best way to build the hip strength necessary to squat humongous weights and as such, it is an amazing exercise for all those who are quadriceps-dominant.
If you are quads-dominant or tend to use the stretch-reflex (rebound) to squat heavy this is the exercise to increase your squat, fast.
What Is It Good For?
- Gets you a lot stronger out of the hole when squatting. Paused squats are “okay” for that purpose, but Anderson squats are in a league of their own. The Anderson squat is especially effective for lifters who are more explosive than they are strong, and who tend to rely heavily on the stretch reflex instead of contractile strength to get out of the hole.
- Develops the capacity to produce tension in the bottom position of a squat. Those with a sub-par hip musculature (psoas, rectus femoris, gluteal group, lateral rotators group, etc.) will have a problem creating lots of tension in the bottom positon of the squat.
That both decreases strength and stability while also making you more likely to lose your position when you reach the low part of a squat (making it hard to have a precise and repetitive technique) which can increase the risk of injury.
If your Anderson squat is significantly lower than your regular full squat, then you might have a problem with the utilisation of your hip muscles to produce force in a squat. And by extension, doing the Anderson squat represents a huge part of the answer.
- It improves hip mobility. Simply getting into the proper position without the weight “pushing you there” during the eccentric will do wonders to free-up your hips.
- It has a very good transfer to the deadlift, especially if you are more explosive than you are strong. Those who are more explosive tend to rely more on the stretch reflex when starting to stand up from a squat. But you can’t do that to a significant extent on the deadlift.
If that person increases his squat it won’t necessarily translate to an increase in deadlift strength. Anderson squats are more specific to deadlifting because you have to create tension right from the bottom and can’t use the stretch reflex, which will make you stronger off of the floor in the deadlift.
How Is It Done?
- Set the bar on the safety pins in a power rack. The height of the pins should be such that once you are under the barbell, you are in your full squat position.
- Get under the bar and assume your regular squatting position (depending on if you squat low or high bar it might vary). Find the position you feel the strongest. The barbell should be over the middle portion of your feet, maybe even slightly toward the heel.
- Establish tension before initiating the rep: screw your feet into the floor (try to rotate them externally), grab the floor with your toes, squeeze the bar hard with your hands, compress your torso with the upper arms, get your abs hard as if getting punched in the stomach.
- Once tension is established you can stand up. It is important to focus on keeping the torso solid: do not bend forward or shift your weight on your toes.
- Lower the barbell with a slow eccentric. This is very important. Concentric-emphasis lifting can be hard to transfer to regular eccentric+concentric movements. So overemphasize the lowering portion to make sure that you get stronger in that regimen too.
Are There Any Different Variations?
The two variations that I like are the Anderson front squat and Anderson Frankenstein squat. To be clear, Paul Anderson only used the back squat so it might be a misnomer to name the bottoms-up front squat and bottoms-up Frankenstein squat after him, but to me “Anderson” means the concept of starting a squat, any squat, from pins in the lowest position.
The Anderson front squat was “popularized” by Dan John, a tremendous coach/writer/speaker that I deeply respect (so maybe we should call them John Squats, ah!). If you are an Olympic lifter (or a Crossfit athlete) and have a hard time recovering from heavy cleans despite having a fairly strong squat, then this is likely the answer for you.
If you have sufficient leg strength but have trouble standing up from your cleans (you have to use a big rebound to stand up or your hips shoot up faster than your torso) it is likely that you suck at producing tension in the bottom position of the squat.
And it’s even harder to do so in a front squat (because of the more upright torso angle). The Anderson front squat trains that skill and you should see a significant improvement in your clean recovery after 4-6 workouts.
NOTE: you might not be able to easily hold the bar with a clean grip in the Anderson front squat. Some can take that grip when they set-up for a regular front squat but have a hard time taking it from the bottom.
If that happens to you it is likely one more cause of not being strong from the bottom of a clean, so you need to work on that. But in the meantime, you can use straps to hold on to the bar.
Anderson Frankenstein squats are a great exercise to build hip and core rigidity, which is lacking in a vast majority of people and is one of the main reasons for not squatting and deadlifting up to your potential.
The Anderson Frankenstein squat (front squat with the arms extended in front of you) along with the Zercher squat from pins is the best exercise to build rigidity while squatting. And always remember that without rigidity, it is impossible to lift up to your strength potential.
What Do You Need To Avoid?
- Do not rush in your set-up. I know it’s not comfortable setting up under a low-positioned barbell, but if you don’t take the time to position yourself well you risk an injury and won’t have a good transfer to your other lifts.
- Another mistake is not creating proper tension before you attempt to lift the weight. This is about the worst thing you can do on any form of squatting or deadlifting, but it’s even worse on Anderson squats since the main purpose of this exercise is to train your capacity to produce tension in the bottom position of a squat.
- Shooting up your hips first is another thing you want to avoid. It will be a natural tendency for those who can’t (or don’t) establish tension before lifting. The torso angle should stay the same (not bend forward more) throughout most of the lift.
- When doing multiple reps, going straight-up into your next rep (even rebounding on the pins defeats the purpose of the exercise. The goal is to start every repetition from a deadstart. So on every rep you lower the barbell down to the pins, reset, establish tension and lift.
What Are The Best Loading Parameters?
Because of the important postural component and the challenge of getting, and spending some time in the low position, I prefer to do this exercise with low reps. The highest I would consider going is 5 reps per set. But that would be with fairly light weights to get used to the movement and improve hip mobility. Normally I use sets of 1, 2 or 3 reps on that exercise and its variations.
It’s one of those movements where I like to do a lot of sets, 8-10. Of course, few of these are actually hard sets. I might do 3-4 hard sets. But I like to have plenty of lighter, but still challenging, sets to work on mobility and on the skill of establishing tension in the low position.
When To Use It?
Since I squat 3, sometimes more, times per week I like to devote one workout to Anderson squats. My three workouts are normally set-up this way:
Workout 1: Anderson squats (back, front, Frankenstein and Zercher also fit in there)
Workout 2: Regular squatting (front or back)
Workout 3: Partial overload from pins (half or quarter squats from pins, front, back or Zercher)
If you want to build your squat up, that is likely the best course of action.
But not everybody has a plan where they squat 3 times a week. If you squat twice a week, this set-up would work well:
Workout 1: Regular squatting (front or back)
Workout 2: Anderson squats and Partial overloads
With the second workout ideally coming prior to a day off.
And if you squat once a week then I like to do a continuous ramp. For example:
Squatting machine continuous ramp
Step 1: Ramp up to the heaviest solid set of 3 you can do on Anderson Frankenstein squats
Step 2: Start at your last weight for step 1 and continue ramping in the Anderson front squat until you hit your maximum weight for 3 good reps
Step 3: Start at your last weight for step 2 and continue ramping in the Anderson squat until you hit your maximum weight for 3 good reps
Step 4: Move the weight to a regular squat stand, use the same weight you finished with on Step 3 and do 1 set of max reps on the regular back squat.
NOTE: “Ramping” means that you gradually add weight until you hit the maximum you can for the prescribed rep number. Even with the lighter weights you only do the prescribed number of reps to avoid accumulating too much fatigue.
– CT